Blog management 101
In this post, I’m going to presume your site is already designed and you have a blog section that’s ready to be filled with content. And I’m going to use WordPress as the example, here, but other platforms will be similar.
If that’s all okay with you, let’s get started!
In this article…
What to write about in your blog
How to structure your blog posts
How to put together your blog posts
What is blog management?
Blog management is about managing your blog in the best way, so you get the most out of it.
That includes:
- Creating the right kind of content for your audience
- Publishing new content regularly and consistently
- Following SEO best practice to keep Google happy
- Categorising and tagging your content properly
- Refreshing and updating your old content to keep everything fresh.
Blogging FAQs
Before we get into the specifics of blog management, let’s answer some of the FAQs around running a successful blog.
Why is having a blog important?
You’re running a business and you have a website — so why should you have a blog?
Most websites are written and optimised for people who know what they’re looking for and are almost ready to buy. This is exactly how it should be, but it also means a website, alone, has some limitations.
For example, your website probably doesn’t cater for people who’ve only just discovered they have a problem and don’t yet know the right terminology to search for you. These people might also have lots of basic questions that your main website doesn’t answer.
And then there are the people who’ve already bought from you and need aftersales support or ideas to help them make the most of what they’ve bought. Your website won’t be helping them either.
This is why having a blog is important. Because it allows you to create amazing content for all these other people.
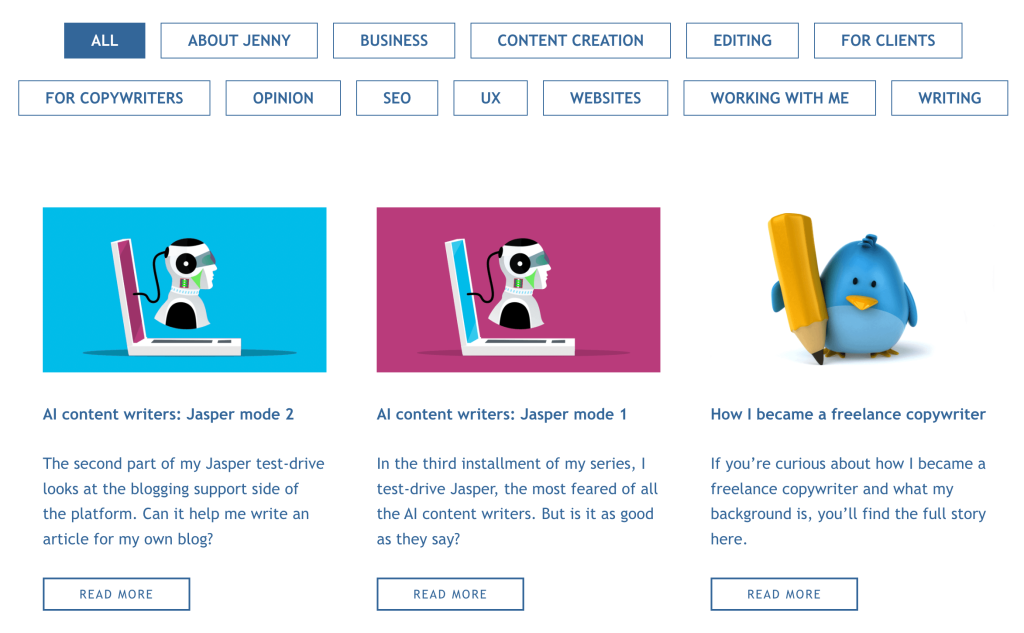
How many articles do you need to start a blog?
Well, technically you can start a blog with one article. But, you have to admit, your main blog page looks better if there’s more than one.
Most main blog pages are formatted to show three article intros side by side, like the example below. So if you start with three, you’ll be starting with a full row.
How often should I blog for SEO?
Blogging regularly is important for SEO because it shows Google your site is active. Every time you publish new content, it gives Google’s “spiders” a reason to crawl your site again and reindex all the pages.
My advice?
If your site isn’t ranking well and you want to improve that, aim to post new content once a week — or more often if you can.
If your site is ranking well and you want to maintain that, once a fortnight or once a month should be enough.
In either case, be consistent. Make a posting schedule and stick to it.
How long should a blog post be?
How long is a piece of string?
No, seriously — because there is no ideal length, no matter what some SEOs might tell you.
If you’re trying to meet a word count, you’ll be tempted to waffle unnecessarily or include lots of extraneous details.
So stop worrying about your post length and:
- Keep it relevant and stay on topic
- Focus on quality — not quantity
- Make sure your content delivers what it promises in the title
- Give your audience all the background and information they need.
Who should write my blog posts?
You could write your blog posts yourself or have one of your employees write them. But you’ll probably find you get a better result if you hire a freelance content writer and strategist for the job.
A professional content writer and strategist should:
- Create a proper content plan to help you reach the full extent of your market
- Research exactly what each target audience is looking for
- Take care of the SEO side to make your content visible on Google
- Research each topic thoroughly, using credible and original sources
- Write targeted content for every section of your audience.
What to write about in your blog

This is where a lot of businesses fail. Because they don’t realise that a blog works best when it’s written for their audience. They post articles their audience would never search for or even want to read.
Often, they:
❌ Have no clear strategy
❌ Have no idea who they’re talking to
❌ Use their blog to post company news
❌ Write sales pitches instead of content.
And when the blog doesn’t seem to be working, they don’t stop to wonder why — and many of them just give up.
So how do avoid falling into that trap?
Write for your audience
Start with a clear idea of who you’re going to be talking to. And there may not just be one audience — there could be several. For example:
- People looking for inspiration and ideas
- Prospects who’ve just realised they have a problem
- Clients you’re working with who need information/support
- Clients who’ve bought from you and need inspiration or aftersales.
Create a strategy for your content that will serve the specific needs of these people.
Write helpful content
Your content should educate, inform, entertain and inspire the audiences you’ve identified.
To attract them, you need to figure out what each audience is interested in and what they’re likely to be searching for. For example, you could:
- Answer a question they’re searching for the answer to
- Create an inspiration guide to showcase one of your products
- Solve a problem they’re having
- Write a how-to post with instructions for achieving something.
These ideas came from my article: 101 Blog post ideas to benefit your business. There are 97 more ideas there, if you’re interested.
How to organise your blog
Effective blog management will give you well-organised blog that will help your readers find the content they’re interested in reading.
On most blogging platforms, you organise your content using categories and tags.

Categorising your blog posts
The first thing to do is decide on the main themes of your blog. These will be your categories.
A maximum of 10 categories is enough for most SMEs.
You can categorise your posts according to your main blog topics and/or for the audiences you want to read them.
The key is to keep your categories fairly general and avoid being too specific.
Tagging your blog posts
If your blog posts are searchable using a site search or blog search, visitors will be able to look up specific topics of interest.
For example, I have SEO as a category and, in that category, posts with a variety of different tags.
Category: SEO
Tags: Keywords, Backlinks, Keyword density, Page speed, Local SEO etc.
We’ll come back to categories and tags a bit later on.
How to plan your content
Effective blog management means planning your content ahead, so you know in advance what you’re going to be writing about each week/month. Having a plan helps you stay on track and be consistent.
There are lots of ways to plan your content and you can choose whichever way feels most comfortable. You might like to use a notebook, diary or calendar. A wall planner or whiteboard, so you can keep it out where you can see it. Or your online calendar and set alarms to remind you what’s coming up and when to get it written.
Personally, I plan my content digitally using Trello.
If you’re not familiar, Trello is an online platform that allows you to create boards with lists and cards. My Content Creation board has 10 lists, which correspond with the 10 categories on my blog.
Every time I have an idea for a new blog post, I create a new card in the relevant list.
I use the card to keep everything I need for writing the post. This includes:
- Keywords I want to include
- Topics and themes I want to cover
- Ideas for the heading structure.
Planning my content electronically, like this, means I can also use the card to store:
- The images I want to use
- Links to any research I want to cite.
When I come to write each piece of content, I have a fully fleshed-out idea and structure, which makes the writing process much easier and less daunting.
How to structure your blog posts
The basic structure of a blog post is this:
- Title
- Introduction
- Main body copy
- Summary/conclusion
- Call To Action (CTA)
The CTA is one of the most important parts of your post because this is where you can get your reader to take another action.
What that action might be will depend on the content of your post and where the reader is in your customer journey.
But it could be:
- A link to your sales page
- Links for further reading on the subject (other blogs in your series)
- A sign-up for your email list
- Downloading a lead magnet
- Signing up for a course/challenge/introductory session.
How to put together your blog posts
There are several elements you need to include when you write and publish a blog post.
- Title
- Headings
- Featured image
- Accompanying images
- Categories and tags
- Meta description
- Excerpt.
Let’s start with the title and headings.
Writing your blog post title
The title you choose should sum up exactly what your post is about. Try to include some keywords in your title, if you can.
Mastering the heading structure
The headings you use in your blog are important for SEO.
Your blog will have six heading options: H1, H2, H3, H4, H5 and H6 — but you’ll mostly be using H1-H4. The smaller the number of the heading tag, the more important it is.
H1 is your blog post title
There should only be one H1 in your post and that’s reserved for your title. Your WordPress may let you add more than one, but don’t because they won’t count.
H2 is for your main headings
Use H2 for all your main headings. You can have as many of these as you need.
H3 is for your primary sub-headings
Use H3 if you need a sub-heading under your main heading.
H4 is for your secondary sub-headings
Use H4 if you need a sub-heading under a sub-heading.
How your heading structure should look
Here’s a simple example to show you how your heading structure should look.
H1: The complete guide to owning a dog
H2: How to look after your dog
—> H3: Equipment you’ll need
—> —> H4: Feeding and water bowls
—> —> H4: Collar and lead
—> —> H4: Bed
—> —> H4: Toys
—> H3: How to feed your dog
—> —> H4: Wet or dry food?
—> —> H4: How much food to use
—> —> H4: How often to feed your dog
And so on.
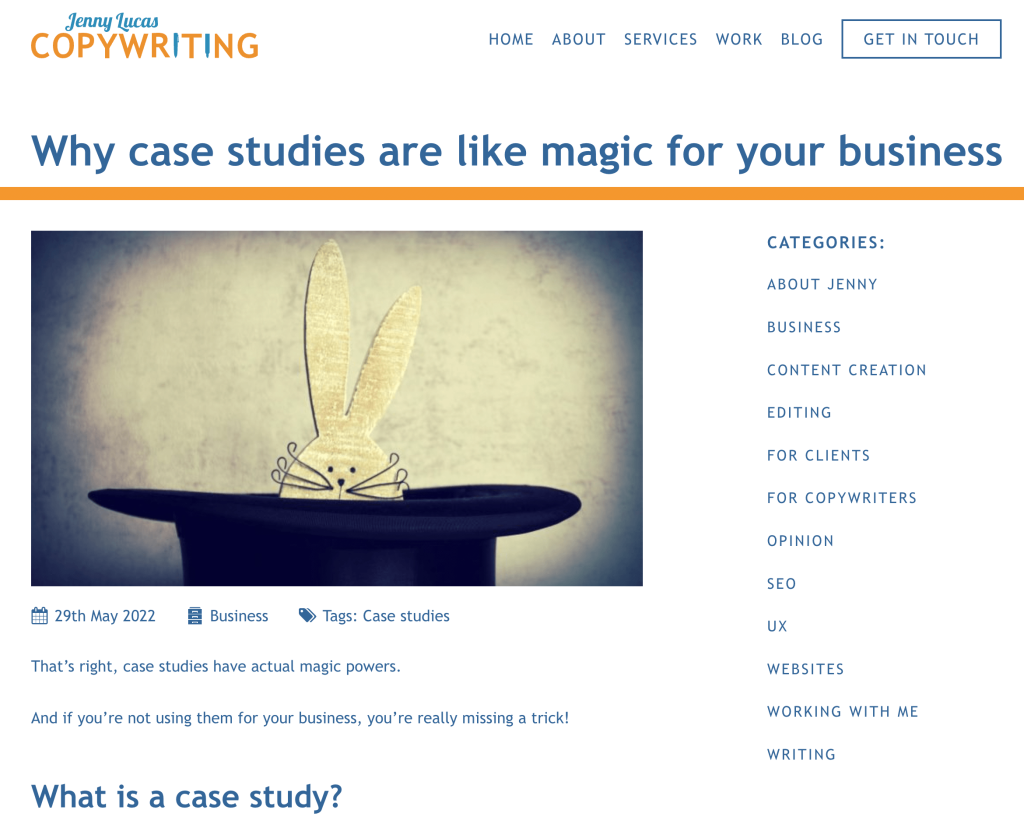
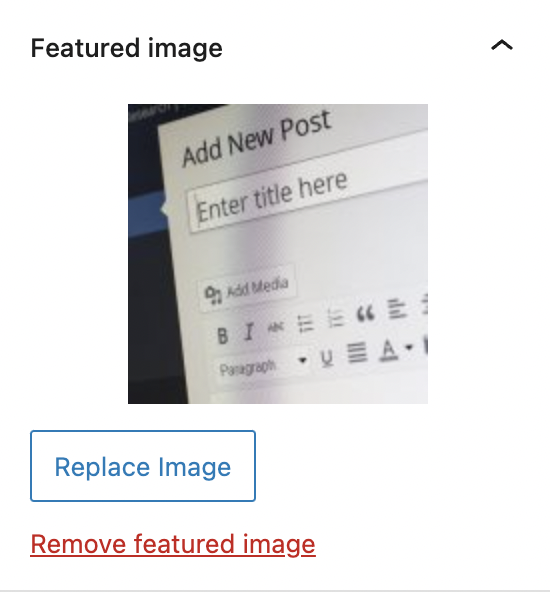
Your featured image
Your featured image is the one that will appear with the introduction to your post on the main blog screen.
See the rabbit in the hat?
It’s also the image that will appear at the top of your post.
Here’s the rabbit in the hat again.
Choosing your featured image
Your featured image should be something that’s relevant to your post as a whole.
You could use one of the images you already have, take a photo, or ask your graphics person to create something. Or you could download a stock image from one of the stock image sites online.
If you download stock images, always be sure to add the attribution to acknowledge the image creator. This is only fair when someone has created the image for you.
If your subject matter is really boring and you’re struggling for ideas, I wrote this blog post on Choosing more creative images for your website, which you might find helpful.
Optimising your image
Once you’ve chosen your image, you’ll probably need to reduce the file size.
Keeping your file sizes small is good for SEO as it means your website can load them more quickly.
Your platform might have an in-built image re-sizer. On WordPress, this is called Smush.
But I always use a website called TinyPNG.com, which compresses PNG and JPG files without losing quality or definition.
I compress the image to reduce the file size, then upload it to my WordPress Media Library.
Annotating your image
When your image is uploaded, you need to find it in your media library and add some details.
Alternative text
Alternative text will display if your image doesn’t load. It’s also used by blind and partially sighted users, who can’t see the image.
In this box, you need to write a short description of around 150 characters describing what the image shows.
Title
In this box, I add the image attribution with the creator’s name or handle and the name of the website the image came from. E.g. Image by PhotographerName at website.com.
But you can also use the box to give your image an optimised title that will help your SEO.
Setting your featured image
In WordPress, there’s an option to set your featured image in the right-hand panel of your screen. You just need to scroll down until you find it.
Adding your accompanying images
Further images can be added to your post as you’re writing.
In WordPress, you choose a new block, then select Image. You can then either upload an image from your computer or choose one from your Media Library.
Remember to optimise and annotate each image you use, to keep your page loading speed down and keep your images accessible for anyone who can’t see them.
Adding your categories and tags
In WordPress, you’ll find the Categories and Tags settings down the right-hand side of your screen.
The panel will look something like this:
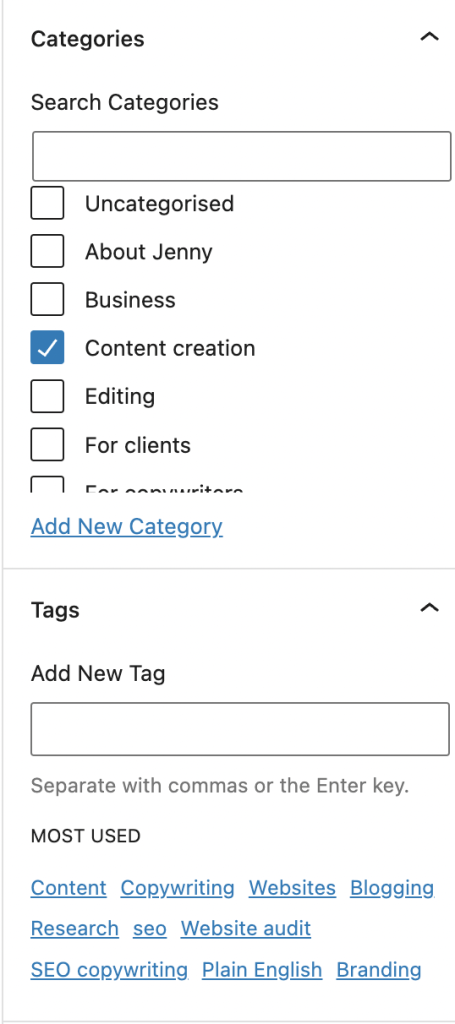
You can choose an existing category by ticking the box next to it or create a new one by clicking ‘Add New Category’.
Then either add a new tag in the box or choose one of your most used ones, if relevant.
Inserting your meta description
Your meta description, aka your meta tag, is the two black lines that appear below your link in a Google search. I’ve highlighted them here to show you. This should be an enticing introduction to your blog post that will persuade people to click your link.
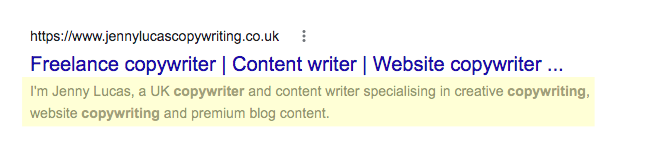
In WordPress, you’ll find the box for your meta description in the Yoast SEO section at the bottom of your screen. I’ve highlighted it in yellow for you below.
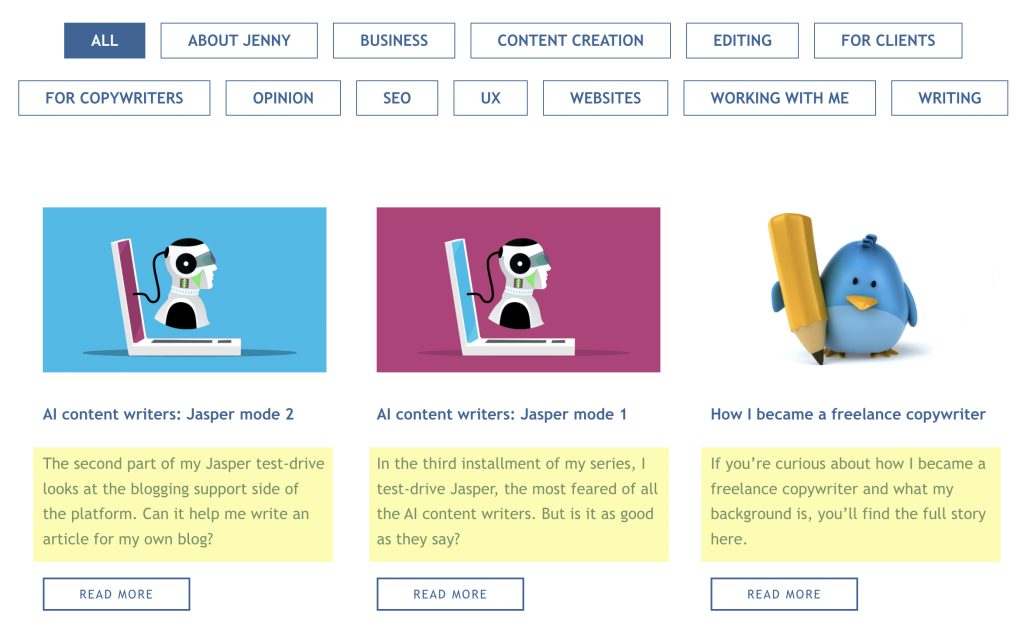
Adding your excerpt
WordPress can be set up to include a custom excerpt for each post. The excerpt can appear in different places depending on how your blog has been designed.
Sometimes it appears at the top of the post itself, but more often it appears on the main blog page as an introduction to each post (highlighted in yellow below).
Publishing your blog post
When your post is written, you’re almost ready to hit publish!
But before you do…
Pre-publishing checklist
1. Final content checks
✅ Proofreading
✅ Final edits/corrections.
2. Post structure
✅ Title
✅ Introduction
✅ Headings
✅ Body copy
✅ Call to action.
3. Post elements
✅ Links to sources
✅ Links to further reading
✅ Categories and tags
✅ Meta description
✅ Excerpt.
4. Images
✅ Featured image
✅ Accompanying images
✅ Image attributions.
When you’ve been through the checklist, you’re good to go and can hit ‘publish’.
Submitting your blog post to Google
As soon as you’ve published, you can submit your live page to Google, which should help your blog post to rank quicker.
To do this, you’ll need to have a Google account with Google Search Console. This is free to use, but will need to be added to your site, much like Google Analytics.
Once you have Search Console on your site, log in. At the very top of the home page, you’ll see a box that says ‘Inspect any URL in [your web address]’. Copy and paste the URL from your post into this box and press Enter.
When the message appears to say this URL isn’t indexed, press the button to ‘Request indexing’.
That’s it, job done! Then you can move on to promoting your post.
Blog post promotion
When you’ve published your post, the next thing to do is promote it as much as you can.
You can do this in a number of different ways. Here are some ideas:
- Post the link on your social media channels
- Send the link to your email list
- Include the article in your paper mailing list, if you have one
- Repurpose the content into other formats (e.g. video, slideshow, podcast, ebook, infographic) and share those, too.
Blog maintenance
A key part of blog management is blog maintenance.
When your blog has been running for 12 months, you’ll need to start maintaining it by making sure your existing posts stay up to date and relevant.
How long should a blog post last?
You can keep a blog post on your site for as long as it’s current, relevant and interesting.
Some blog posts are what we call ‘evergreen’, which means they never date and can stay indefinitely.
Other blog posts will need continually updating to make sure the information in them is kept current and useful.
When I’m writing a blog post myself, I aim to never use information that’s more than two years’ old. So if you update the information and source links in your articles every year or every two years, that should be okay.
Some blog posts will become irrelevant after a time. You may be able to repurpose some of these, but others will just need to be deleted.
How to introduce a blog maintenance schedule
Ideally, for every new post you write, you should also revisit a past post and update it with the latest information and source links.
Further reading
If you’re interested in learning more about blog post writing, the following articles might be of interest:
101 Blog post ideas to benefit your business >>
How to break up long content >>
How to write better content >>
How to conduct online research like a pro >>
Need a content writer for your business?
I’m Jenny, a copywriter and content writer based in Leicestershire, UK.
For the last 15+ years I’ve been helping SMEs in all kinds of industries add value to their websites with premium SEO content that attracts, educates, inspires and converts.
If you’d like to find out more about how I could help you, visit my Content Writing page or Get in Touch.