
UPDATED OCTOBER 23, 2025
How long should a blog post be?
According to research by Capsicum Media, the ideal length for a blog post in 2025 is 2,000 to 2,500+ words.
They reached this figure based on a study of the word counts of the top 10 results featured on page one of Google.
2000+ is a lot of words

Yes, indeedy! But the idea is that the longer the content, the more value it should have.
Value is an important thing to remember when planning your content — especially now AI-powered search is becoming more of a thing.
How is AI-powered search changing things?
With AI-powered search, more search queries are answered in the search engine interface itself. Think Google’s featured snippet, but a longer and more detailed summary with information pulled and assembled from multiple different sources.
In practice, this could mean people will only go to a website if they want more detailed information than the AI answer provides.
How should you plan your content?
For your content to rank well, it needs to give substantially more information than a user will get from the search engine’s AI summary. This means it needs to be longer and more in-depth, so it covers more ground and answers more questions.
To create this kind of content, you should be looking at more open titles that allow you to cover your topic in more detail. The more pointed questions we used to use as titles should now be headings inside the longer posts.
Of course, if you’re a seasoned content writer who follows the latest guidance, you’ll know this has been the case for some time.
But what about your human audience?
Let’s say your human reader looks at the search engine summary and decides they want more information. Are they really going to sit down and consume 2000+ words of your content in one sitting?
Probably not.
More likely, they’ll want to read a specific section of it — and they’ll want to find that section as quickly and easily as possible.
This is why breaking up your long content is so important.
How to break up long content
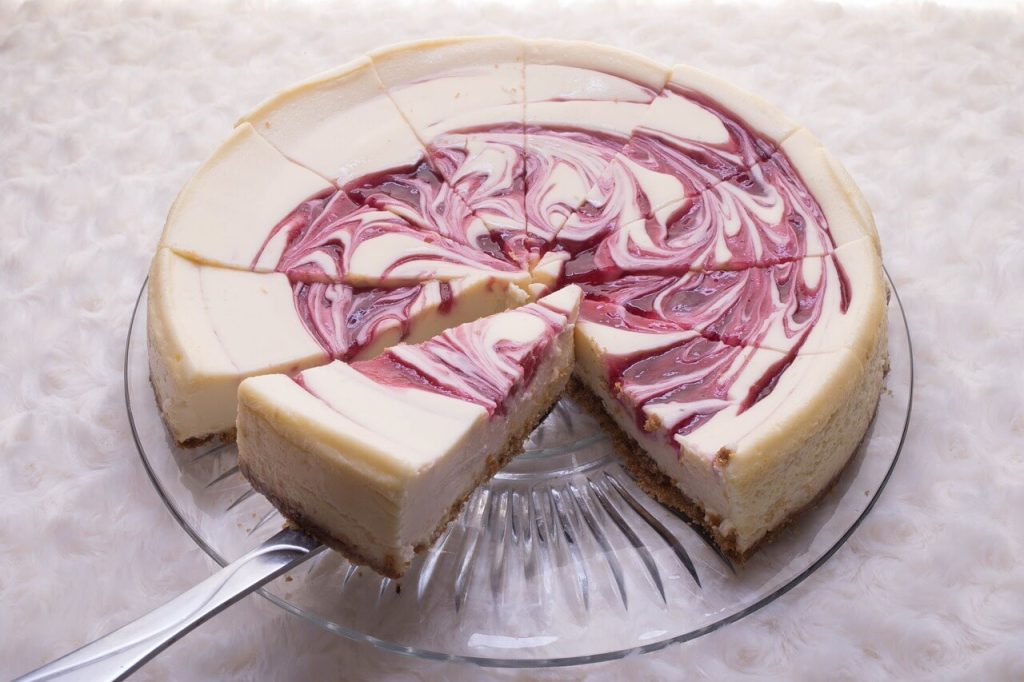
When we break up long content, we divide it into smaller and more manageable sections, so it’s easier to consume. A bit like this cheesecake.
Some readers might want just one slice and some might have an appetite for two or three. Some might want more blackcurrant swirl and others, more plain cheesecake. You get the idea.
There are two main ways to break up long content: You can split it into more than one article, or you can keep it as one long article and split it into sections and sub-sections. The latter might be better, in light of everything I’ve just said, but it’s really a judgement call.
Using more than one article
There are a few options here. The one that’s best for you will depend on the kind of content you have.
Break it down into individual articles
Sometimes a piece of content can start to deviate from the main topic and go off in lots of different directions. If you’re writing on the fly, this might happen as you’re writing it, but more often, it happens as the article evolves over time.
An article that goes off on lots of tangents like this can start to detach itself from the original title and take on a life of its own. More concerning, it can become confusing and difficult for readers to follow.
If your existing content is starting to grow new content, it’s often better to take that new content and use it to write another article.
Where you feel there’s an overlap, you can use internal linking to tie the articles together.
Serialise your posts
This may be a good option if you have long content that:
- Follows a chronological order
- Is a step by step process
- Introduces a subject in stages.
When you create a series of posts, each post builds on the knowledge and information that was introduced in the posts before it. So each post should link to the previous posts in the series for anyone who’s late to the party.
To create your series, look at all the content you have and look for ways to divide it up as evenly as you can. For example, you could split it into:
- Date ranges or time periods
- Breakpoints in your story
- Sections of your process
- Stages of your subject.
Publish each installment of the series in order and devise a unique hashtag when you promote them on social media that will tie them all together.
Create a content hub
If you’re assembling a large, detailed article that focuses on several areas of the same topic, you can break it down and create what’s called a content hub.
What is a content hub?
A content hub is a series of related articles on a given subject.
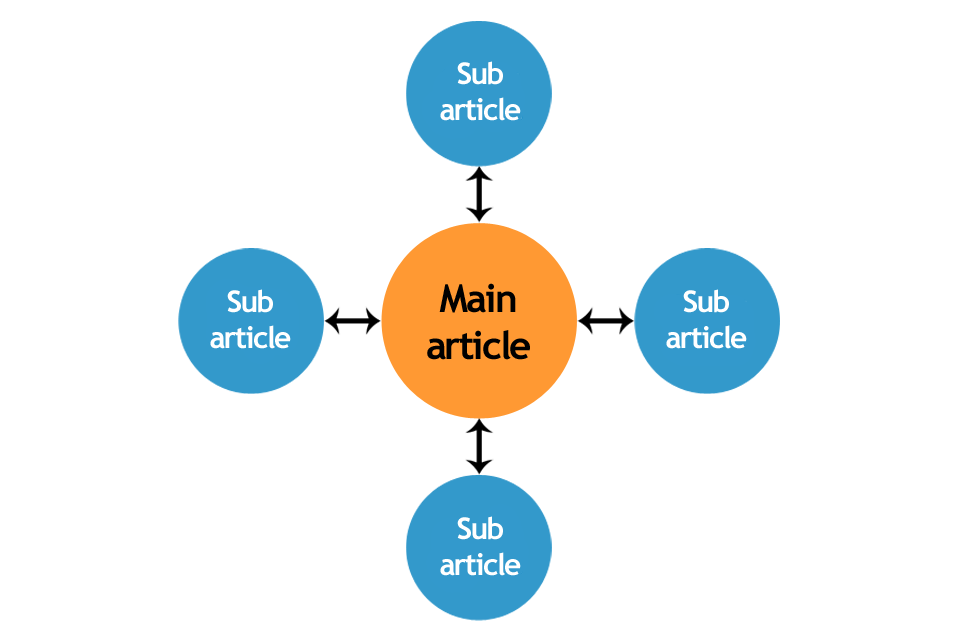
It consists of a main article, known as a pillar article, that introduces, and summarises, each of the topics in the hub, then links to a series of sub articles that cover each of those topics in more detail.
A simple content hub
A simple content hub might look like this, with the main pillar article linking to a series of more detailed, independent sub articles:
The benefits of content hubs
A content hub will allow you to build your expertise and authority on a particular topic by creating lots of valuable content around it.
Content hubs are great for SEO, because writing lots of high-quality content on a subject allows you to target and rank for lots of different keywords.
Google likes content hubs because they’re incredibly comprehensive sources of information. This is the kind of content Google likes to direct its users to, because it will answer all their questions.
And your human audience will also find content hubs convenient because they can bookmark your main article and use it to access all the others.
Breaking articles into sections
With some articles, it makes more sense to keep them as one. But you can break them down into individual sections and sub-sections with a relevant heading to introduce each one.
Here are some tips and ideas for breaking down longer articles effectively.
Organise your information
Before you start writing, you need to organise your information into a logical order that will read well and make good sense.
Start with a list of contents and anchor links
You could start your article with a list of contents. This is particularly helpful for list content and FAQs, where there are clearly defined sections that don’t need further context.
Each item on your list of contents becomes an anchor link to that section. And this allows readers to skip straight to the section they want to read.
Use headings and sub-headings
Most readers will naturally skim-read your content, so you should make this easy for them, using relevant headings to introduce each section and sub-section.
The headings should act as signposts, helping them to navigate your article and find their way to the specific sections they want to read.
Headings are also important for your SEO, helping search engines and AI-powered search, work out what your article is about and what information it contains. To get the best result, take time to research your headings and make sure they’re aligned with what your audience is searching for.
Use the proper heading hierarchy
In your blog articles, there’s a hierarchy of headings you should use. These headings run from H1, which is the largest and most important, to H6, which is the smallest but still counts.
The most commonly used headings are H1 to H4, so let’s look at those and how they should be used.
H1: Title
The H1 is the title of your article and will be at the very top. There should only be one H1 on each page and it should be optimised so it’s in line with what your audience is searching for.
H2: Main headings
After the main title, all your main headings should be H2s. Use these to head up each of your main sections.
H3: Subheadings
Use subheadings to break up the content within each section. The H3 headings should be used to create the primary subsections under an H2.
H4: Subheadings
Your H4 subheadings should be used to create secondary subsections under an H3.
If you need to create tertiary or quaternary subsections, you can use the H5s and H6s respectively.
Here’s an example showing those headings in action:
More ideas for making it bite-size

Using different types of headings
Most headings fall into one of these five categories.
Statement headings
Statement heading example: The equipment you’ll need for wallpapering
Use a statement heading to describe what you’ll be talking about in the section.
Topic headings
Topic heading example: Wallpaper paste
Use a topic heading to describe each new topic.
Instruction headings
Instruction heading example: How to measure the height of your wall
Use an instruction heading when you’re introducing a set of instructions.
Question headings
Question heading example: What are this season’s wallpaper trends?
Use a question heading to ask a question your audience is asking, then use the section copy to answer it.
Intriguing headings
Intriguing heading example: The number one wallpapering mistake
Use an intriguing heading to get your audience’s attention and make them want to read what comes next.
Use different article structures
Finding effective ways to structure your posts will help you break them down.
List posts
Break your content down into a numbered list of points.
Human audiences love a list post. From the title alone, they can gauge roughly how long the post will be and how much value it contains. List posts are also easy for them to skim-read and extract the information they’re looking for.
Here are a few examples of what a list post title might look like:
- 10 Easy ways to…
- A 15-step guide to…
- 20 Good reasons to…
- The top 10…
- 101 ideas for your…
Pro style tip: The number of items in the list is usually written as a number.
Question and answer posts
You could structure your article as a series of questions and answers, with the headings as the questions and the body text as the answer.
Questions are more conversational and have become popular with voice search and AI.
You can find out what your audience is asking and how they’re phrasing their questions using sites like Answer the Public and Quora. Or by visiting forums and comments sections relating to your subject.
Inspiration posts
If your post is designed to inspire your readers with examples, you could divide it up into categories. Depending on what your post is about, some sample categories might be:
- Seasons
- Colours
- Animals
- Weather
- Rooms
- Sizes
- Product types.
Content formatting tips
As I said previously, many readers tend to skim read content these days. But there are some things you can do to encourage them to read more.
- Break up dense walls of text into short paragraphs
- Use lots of white space
- Display lists as bullet points
- Use maps for geographical information
- Show statistical information in easy-to-read charts
- Use colourful diagrams to show processes
- Include relevant images to add visual interest
- Segment information and highlight important points using different coloured boxes
- Separate quotes from the rest of the text
- Include GIFs or video to show how things work, rather than just describing them.
You might also like…


About the author
I’m Jenny Lucas, a UK freelance content writer based in Leicester, UK.
I’ve been writing compelling content since 2005 and now work as a freelancer, blogging for clients in a range of different businesses and industries.
If you need content for your blog and you’d like to find out more, please visit my website.